What Is HDR Photography: Know This Before You Shoot
September 05, 2025

To shoot scenes the way your eyes see them, the first thing you’ll want to understand is what is HDR in photography.
I still remember the first time I tried to capture a sunrise that looked like it did in real life — the sky blazed, the foreground was murky, and my camera gave me one miserable exposure that satisfied neither. That day, I learned HDR. Over the years, I’ve used it to rescue high-contrast scenes, keep detail in shadows, and sometimes to overdo the drama.
You might be wondering, what does HDR stand for in photography and why it matters. In this guide, I’ll walk you through the practical bits I wish someone had told me: what high dynamic range is, what gear and settings help, how to do it from one image or several, and the right ways to use HDR without turning your photos into neon paintings.
What Is HDR?
 Let’s start with a clear definition of HDR in photography so you know what it actually means. HDR, or High Dynamic Range photography, is a way to bring out all the details in a scene — from the darkest shadows to the brightest highlights — in a single image. It works by combining multiple shots of the same scene taken at different exposures. This way, the final photo looks closer to what your eyes actually see.
You don’t always need multiple shots, though. You can also create an HDR image from a single RAW photo. So basically, there are two ways to make an HDR image: using multiple images or just one RAW image.
HDR Requirements
 Before you head out, here’s what I always pack in my kit for reliable HDR:
A camera that shoots RAW (this matters).
A tripod for precise alignment when I use multiple exposures.
A lens I trust (no point pushing poor optics into complex processing).
Remote release or 2-second timer to avoid camera shake.
If you’d rather be minimal: shoot RAW and plan to bracket exposures handheld — modern software can align frames well, but a tripod makes life easier. When I’m on a hike and can’t carry a tripod, I bracket handheld but slow my breathing and use high shutter speed.
Also, think about scene stability. HDR works best when elements don’t move between frames — obvious items like people or cars will ghost unless you use de-ghosting tools. For moving subjects, I often use single-image high dynamic range techniques instead.
HDR Photography Using a Single Image
 There are times when I only have one RAW file, and I still want the extra range. Single-image HDR is more than a fallback — it’s often my go-to for scenes with movement or when I’m traveling light. Many beginners confuse filters with HDR, but the actual HDR photo meaning is about dynamic range, not artificial effects.
How I do single-image HDR in practice:
Open the RAW in an editor and pull highlights down and shadows up. If exposed correctly, RAW files store a surprising amount of shadow/highlight information.
Use local adjustments: paint exposure into shadowed areas and protect highlights with masks.
Use targeted tools for micro-contrast and clarity, but sparingly.
Example: I shot a market stall at noon once — bright sun on the tent roof, deep shadow inside. I brought back the tent highlights by dropping +3 stops of highlight recovery, and then I raised the shadows by +2 stops in just the stall using a brush. The result had the stall’s texture without flattening the whole image.
One more thing: I sometimes use plugins or features labeled “structure” to emphasize midtone contrast. That can help when the scene feels flat after basic adjustments — for instance, try enhancing photo structure to bring out textures in wood, brick, or fabric without pumping global contrast into the clouds.
HDR Photography Using Multiple Images
When I have the time and a tripod, I prefer multiple exposures. The benefit is cleaner shadows, less noise, and more latitude to preserve natural tones. When shooting HDR, I always double-check that my exposure brackets cover both the brightest highlight and the darkest shadow.
Here’s the workflow that works for me:
Compose and focus once.
Switch to manual focus and set the aperture.
Lock ISO and white balance so only exposure changes.
Take a bracketed series: three frames at ±2 EV for moderate contrast, five frames from −4 to +4 EV for extreme scenes.
Import into HDR software (I’ll mention practical choices below) and let it align and merge.
Example: I photographed a cathedral at sunset. The stained glass glowed, but the nave was murky. I shot seven frames from −6 to +2 EV (yes, I deliberately metered more for highlights here) and merged them. The merged file let me reveal the stonework in the nave while keeping the glass colors intact.
How to Merge Your HDR Shots
After capturing multiple exposures for HDR, the next step is to merge them in software. This is where the magic happens — you combine all the details from the shadows, midtones, and highlights into a single balanced image. Here’s a practical workflow I follow that helps avoid common mistakes.
Step 1: Load and Align Your Photos
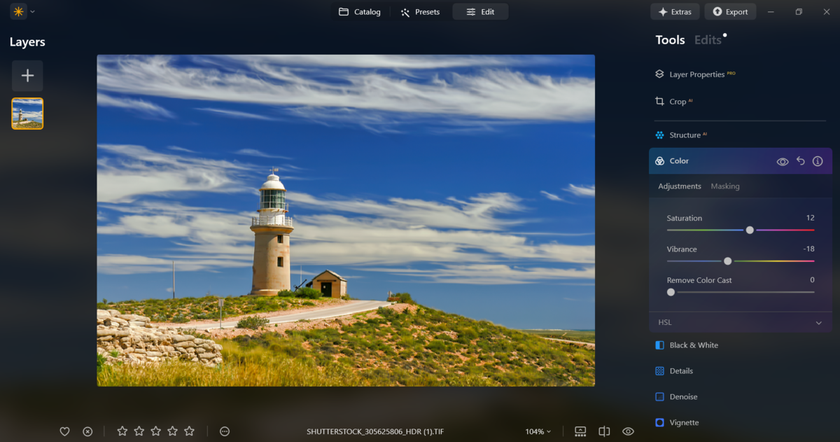
Even if you used a tripod, small shifts between shots are common. Most HDR software, including Luminar Neo, has an auto-align feature — always use it to make sure all your images line up perfectly. Misaligned frames can cause blurry edges or ghosting later.
Step 2: Remove Ghosting
Moving elements like leaves, clouds, or people can create strange “ghosts” in the merged image. Turn on de-ghosting by default. Luminar Neo handles this automatically, but it’s good to double-check areas with motion to avoid distractions in your final image.
Step 3: Tone-Mapping and Initial Adjustments
Once your images are merged, your software will create a combined HDR file. Start with a natural or standard tone-mapping preset — this gives you a balanced starting point. From there, you can tweak global contrast, shadows, highlights, and saturation. The goal is to bring out the details without making the image look artificial.
Step 4: Watch for Common Issues
After merging, it’s easy to overdo adjustments. Here are the things I always check:
Halos around high-contrast edges – reduce strength if needed.
Over-saturated skies or colors – dial it back to keep it realistic.
Noise in shadow areas – apply targeted denoising tools to clean up dark regions.

Step 5: Check Composition and Framing
HDR merging can subtly shift how a photo feels. Once your image is merged and adjusted, double-check the framing. Tools like Luminar Neo’s picture composition AI make it easy to refine cropping and alignment without losing the story of your scene.
Enhance Your Photography with HDR Merge
Get Started NowHDR Done Right — and Wrong
Let me be blunt: HDR can be abused. I’ve seen wide dynamic range images that look like somebody photographed a comic book — blown colors, fake glow, and haloing that screams “processed.” I often tell novice shooters two guiding principles:
If the scene looked believable to your eye, aim to keep it believable in the final image. HDR is about matching perception, not inventing it.
Less is usually more: subtlety wins.
Here are my dos and don’ts from experience.
Do | Don’t |
Use HDR to recover details of what your eye saw (interior/exterior windows, sunsets). | Crank saturation past the realistic color range. |
Keep global contrast modest after tone-mapping and add local contrast where needed. | Use heavy local sharpening everywhere; it creates halos. |
Watch skin tones — people look wrong when pushed too far. | Merge wildly different frames (e.g., with moving sun) without checking for ghosts. |
If you’re just starting out and wondering how to take HDR photos that actually look good, following these rules will save you from a lot of common mistakes. Also, when you want to enhance mood quickly, experiment with increasing contrast in small doses and masked zones instead of global sliders. Increasing local contrast often enhances depth without making clouds or faces appear unnatural.
Summing Up
Think of this guide as an introduction to HDR photography, written from my trial-and-error experiences behind the camera. High dynamic range gave me a chance to stop settling for single, compromised exposures and to start making images that reflect what I actually saw. It’s a tool, not a style, and with a few simple habits — shoot RAW, bracket thoughtfully, use a tripod when practical, and resist over-processing — you can add HDR to your toolbox without turning every picture into an HDR cliché.
Whether you prefer single-image recovery for moving scenes or multi-frame merging for landscapes, the goal is the same: preserve the scene’s detail and tone in a way that feels honest. Go out, try a three-frame bracket, and notice the difference when you bring shadow texture and highlight detail back to life.


