View plans

Sense of Speed With
the Motion Blur Effect

Add a dynamic and energetic effect to your photo with the motion blur effect in Luminar Neo. Make an ordinary photo appear more exciting and captivating in a few clicks thanks to this shaky photo effect!

View plans

How to Create Stunning Visuals: Using the Motion Effect on Pictures
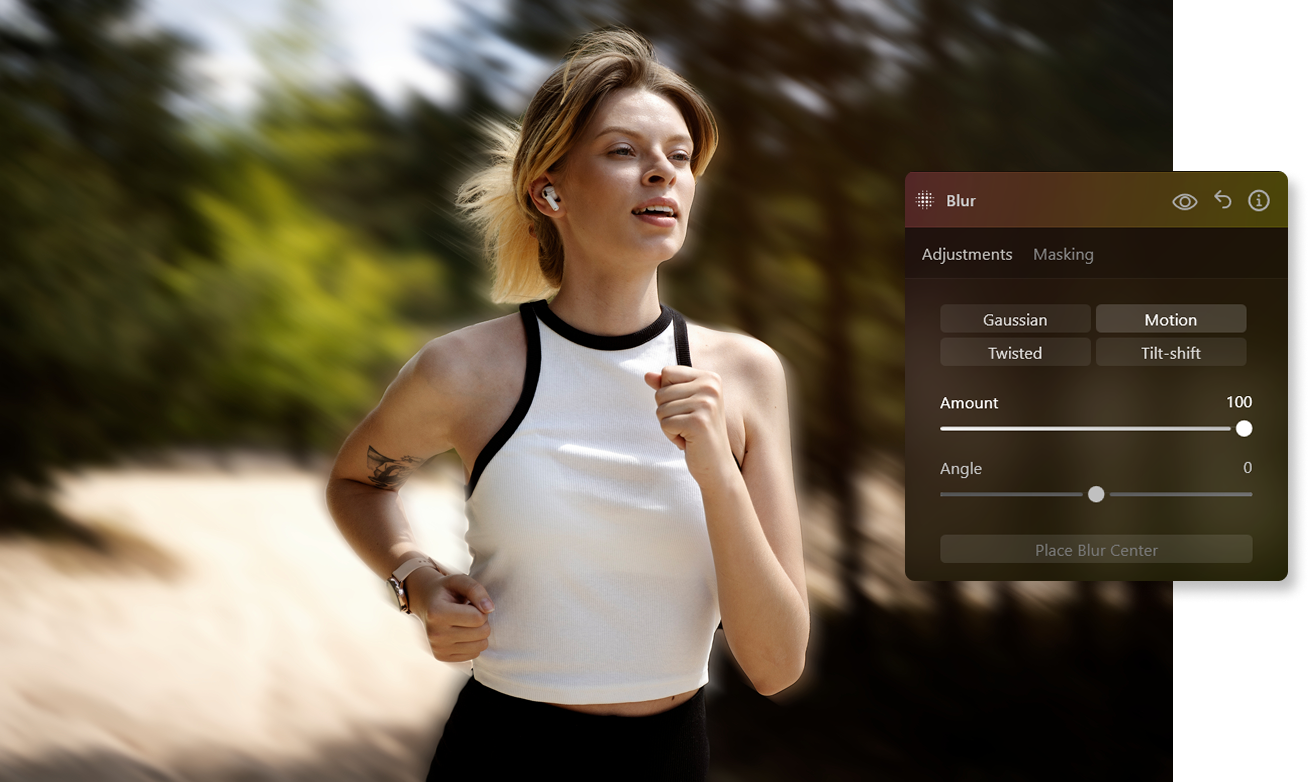
Find Luminar Neo’s Blur Tool in the creative tab. You can choose between different types of blur, including Gaussian, Twisted, Tilt-Shift, and Motion Blur.

The Motion blur replicates the visual effect of objects in motion, such as a speeding car or a swiftly moving subject. It generates streaks or trails in the direction of the movement, adding a dynamic and kinetic quality to your motion blur photo.
(2)
© Depositphotos
(3)
(4)
(5)
Before
After
© theshots.contributor

Why Should you Embrace Motion Blur in Your Photography?

Convey motion or speed, emphasize action, create a sense of drama, or even be used to hide imperfections. Create motion blur pictures of vehicles, running people, airplanes, animals, or other moving subjects, and see its powerful effect!

Beyond Stillness: the Wonders of Motion Blur Photos

By adding motion blur, you can imply a story or narrative in your photo. The viewer might wonder what happened just before or after the moment captured in the image, creating intrigue and interest.
(6)
(7)
(8)
Before
After
© germay10

Adding Depth and Drama with a Motion Blur Generator

Here's a step-by-step guide to adding a creative motion effect to an image:
1. Begin by duplicating the layer. Right-click on the layer and select the "Duplicate" option.
2. Next, head to the Creative Tools section and choose the Blur tool.
3. Within the Blur tool options, select "Motion Blur" and set the amount to 100%. Keep the angle at its default value of 0.
4. To make the motion effect more prominent, close the Blur Tool by clicking the "Blur" title and reopen it.
5. Reapply the same settings with a 100% blur amount.
6. Now, stretch the duplicated layer. Open the Layer to reveal a bounding box around it. Click on the center point along one side and drag it outward to elongate the image. You can also move the image to the left to reveal the bottom layer.
7. Lower the opacity of the stretched layer to reveal the bottom layer more prominently. Adjust the position as needed.
8. Like the previous tutorial, mask the subject's face on the top layer to maintain clarity.

Explore Other Features

Luminar Neo has plenty of other features to help you edit faster and easier
(9)
Golden Hour
(10)
(11)
Before
After
© danmir12
Golden Hour
 Enhance your photos with the warm, soft, and diffused light of the golden hour.
(12)
Change Background Color
(13)
(14)
Before
After
© Garetsworkshop
Change Background Color
Enhance your design projects with a background changer, a simple yet impactful tweak.
(16)
(17)
Before
After
© Cuma Cevik
SkyAI
Elevate your images with stunning photo filters
(18)
Saturation/Vibrance
(19)
(20)
Before
After
© shutterstock
Saturation/Vibrance
Explore our tools to customize the perfect image saturation and bring your visuals to life.
(21)
Dehaze Photos
(22)
(23)
Before
After
© Dima Sytnik
Dehaze Photos
Effortlessly reveal hidden details and vibrant colors.
(24)
Unblur Image
(25)
(26)
Before
After
© Ksusha Kazak
Unblur Image
Unlock the power of clarity and transform your blurry shots into crystal-clear masterpieces!

An application & plugin
For macOS & Windows

  • High-performance AI editor
  • 24/7 technical support

  • 30-day money back guarantee

  • Join community of Luminar Insiders

(27)view plans

By buying our products you help

🇺🇦 Support Ukraine

Frequently Asked Questions

How to add motion blur to a photo with Luminar Neo?


Find the Blur tool in the Creative tools in Luminar Neo. Select Motion Blur. Add motion blur by masking up the desired area, or apply it throughout the photo. Adjust the opacity slider if needed.

What's the difference between radial and linear motion blur effects?


Radial motion blur creates a blur that radiates outward from a central point. It gives the impression of motion away from or toward the center of the image. Use it convey a sense of rapid movement, explosion, or a centrifugal force effect. 

Linear motion blur creates a blur that follows a linear path, typically in a single direction. It gives the impression of movement along a specific trajectory. Use it to convey the movement of an object in a straight line, such as a car on a road, a person walking, or a moving train.

Can I adjust the intensity of the motion blur effect?


Sure! Tweak the Opacity slider to reach the desired effect.

Can I selectively apply the motion blur effect to specific areas of my photo?


Of course. There is a handy masking brush that you can use to apply a motion blur edit only to the desired area. 
(37)