Steel Wool Photography
Last Updated on September 05, 2025
Discover the art of steel wool photography and learn how to capture stunning long-exposure shots with fiery sparks.
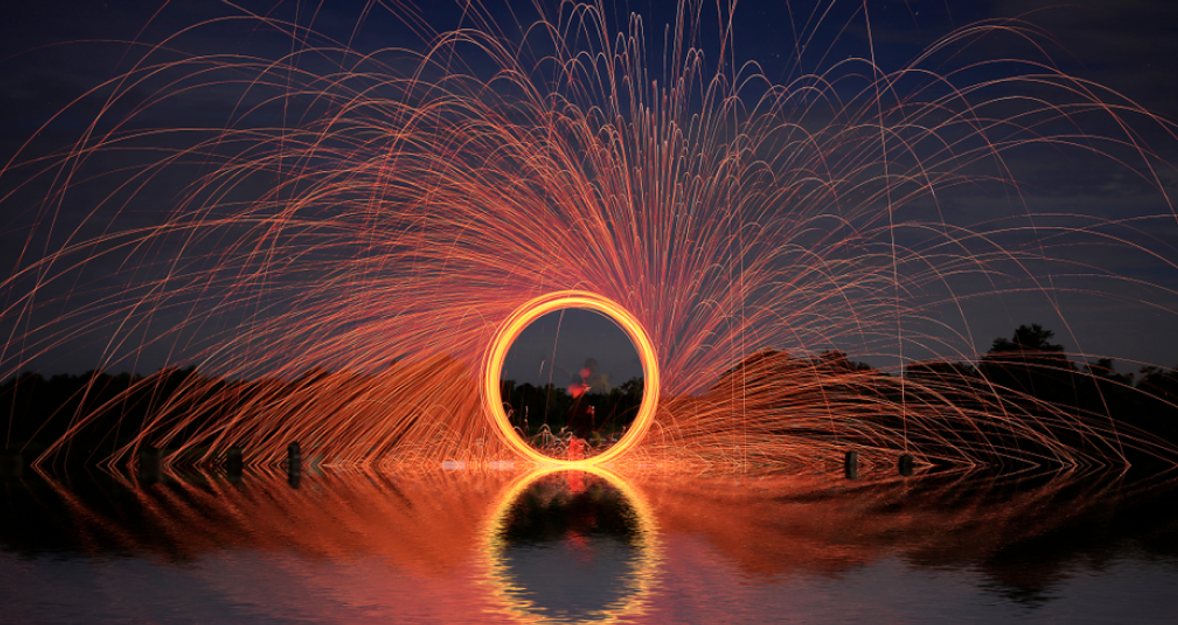
Imagine: in the middle of the night, fiery sparks fly, creating the impression of stars. It all lasts a few seconds, but the photos are impressive. In this article, we will learn how to do steel wool photography. Let's look at all the stages of shooting and the aspects of each of them.
What is Steel Wool Photography?
 Steel wool photography is a type of photography that uses a long camera exposure. The frame shows burning steel wool. It is spun, and the iron mixes with oxygen, causing the material to burn. At first glance, it seems difficult. However, if you prepare in advance and are familiar with the entire process, you will undoubtedly capture the best shots.
Equipment for Steel Wool Pictures
Before heading out for a shoot, it is worth preparing properly. Which cotton wool works best for this technique? What camera settings will give the sharpest results? What is aperture, and how does it influence the image? Which accessories should you take for spinning, and what protective gear will keep you safe? All of these points are explained in detail below.
Steel Wool for Photography: Which Type to Use?
 Steel wool is a bundle of tangled, thin, and flexible steel threads with sharp edges. It is used for polishing wooden or metal objects, cleaning, and sanding surfaces.
There are 3 categories (and there are 8 gradations in total) of wool based on its abrasiveness. Let's take a look at these types:
coarse grades (3, 4): thick fibers, burns poorly;
medium grades (0, 1, 2): requires strong ignition because it is more difficult to ignite;
fine-grade (00 or 000, 0000): very thin fibers, so oxygen quickly reaches the steel. Easy to ignite, so it is the best option for shooting.
Do not choose stainless steel, cotton wool, or soapy or treated pads (e.g., Brillo). They do not burn because of their coating.
Tools for Spinning: Whisk, Rope, and More
 Most often, a kitchen whisk is used for steel wool pictures. Place the steel wool inside, and attach a rope or chain to the handle. Sparks will easily pass through the holes. Plus, it's a cheap option.
Choosing between rope and chain? Let's consider these two options. If the rope is not fire-resistant, it can burn. Therefore, choose Kevlar rope with a metal clamp. A chain is safer because it does not burn. It adds a little more weight and helps to better control the spinning.
Also, use a carabiner or swivel clip to attach the rope or chain to the whisk handle. A swivel clip helps to rotate the structure smoothly without tangling. Poi gear consists of Kevlar cords and handles adapted for steel wool, which fire dancers use. Note that these people have been working with fire for a long time.
Must-Have Camera Gear for Steel Wool Photos
 During long exposures, the camera must be stationary, so make sure you have a tripod. The steel wool photography settings must be manual so that you can adjust them to the conditions of your photo shoot. Look at the top of your camera; there should be a dial with the letter M on it.
To protect your device from sparks, use a protective UV/clear filter on the lens. And for a better shot, choose additional lighting.
Recommended Camera Settings

It is recommended to use an aperture of F/8 to F/11 for optimal depth of field and light control.
Select manual focus. We also recommend focusing in advance on the point where the person working with steel wool will be.
Set the exposure to 10-20 seconds, which will be sufficient to capture the sparks as the wool spins.
Set the ISO to 100-200 to avoid excessive noise.
If the sparks are too bright, select an aperture of F/11-F/16.
If the background is too dark, increase the ISO to 400.
For a long time, fiery sparks set the exposure to 20-30 seconds.
For better post-processing, set the mode to RAW.
Precautions for Burning Steel Wool Photography
Once we have learned about camera settings, equipment, cotton wool type, and scrolling design, we need to move on to the next steps.
Protective Gear and Fire Safety Measures
 When creating steel wool fire photography, remember to prioritize safety. Iron oxidizes quickly and can reach temperatures of 1000ºC. Therefore, the model in the frame must wear goggles, special gloves, and a protective hat. Be sure to choose cotton or wool clothing or special fire-resistant clothing. Avoid synthetic fabrics, as they melt and stick to the skin. The clothing set should include closed pants and a long-sleeved shirt or jacket.
Choosing the Right Location for Steel Wool Fire Photography
 Don't forget about fire safety rules to prevent any damage. Select an open area with no dry grass, trees, debris, or buildings nearby. It is better to light the cotton wool on sand, concrete, or asphalt. Always have a bucket of water, a bottle, or a wet rag handy. And remember that one hand can twist, while the other must always be ready to grab water and extinguish the fire.
Never attempt steel wool photography indoors, as sparks can easily ignite nearby surfaces. Outdoor sessions are much safer, but avoid strong wind — unpredictable gusts scatter the sparks and increase the risk of accidents. Once the spinning is over, check that the wool has burned out completely and no glowing embers remain.
For the most striking results, shoot at night when the bright sparks contrast against the dark sky. Water locations work especially well: they add safety, while reflections on the surface create depth and visual drama. Rocks or other textured backgrounds emphasize the intensity of the scene, but if no such setting is available, you can always remove the background and replace it with one that fits your artistic vision.
Where Can You Legally Do Steel Wool Photography?
Location type | Security | Legal aspects |
Beaches | Minimal risk of fire, because there is water all around and sand underfoot. | Check local regulations regarding fires on beaches. |
Parking lots | Non-flammable surface, atmospheric, and enough space. | You may need a city permit. Also, check to make sure there are no cars too close. |
Tunnels | A dark space at the end of which you can put a backlight. | Access may be restricted. |
Bridges | A nice additional light from the city lights. Or the reflection of sparks in water. | Watch out for cars and people to avoid endangering anyone. It is also necessary to check whether it is allowed to take a long exposure photograph of this particular bridge. |
Quarries or industrial zones | Remoteness, unique view, lots of nature. | Some of them are private, and permission from the owner is required. |
In this table, we have compiled the most convenient locations for shooting, taking into account safety conditions. However, do not forget to check the rules for using the area or ask for permission from the authorities or owners.


Step-by-Step Guide: How to Do Steel Wool Photography
Steel wool photography combines long-exposure techniques with burning metal fibers to create striking trails of sparks in motion. The method looks complex at first glance, yet it follows a clear sequence that ensures both safety and strong visual results.
With the right preparation, camera settings, and attention to detail, photographers can capture dramatic bursts of light that transform ordinary locations into dynamic and visually striking compositions.
Step 1: Setting Up Your Camera and Tripod
A stable tripod is essential for long exposures, as even the smallest vibration will blur the trails of sparks. Position the camera on firm ground, making sure it will not shift during spinning. A remote shutter release or camera timer prevents motion shake when starting the exposure.
Step 2: Adjusting Steel Wool Photography Settings
Use manual mode to control the exposure fully. Typical settings include ISO 100-200, aperture between f/8 and f/11, and a shutter speed of 10-20 seconds. These parameters keep the background dark while capturing bright sparks with clear definition. Wide-angle lenses are best suited for capturing the entire scene and creating circular light trails.
Step 3: Prepping Your Steel Wool for Fire Spinning
Use fine-grade steel wool (0000) for consistent sparks. Insert it into a metal whisk attached to a rope or chain with a swivel clip for smooth rotation. Carry a fire extinguisher or bucket of water to handle emergencies. Before lighting, gently fluff the steel wool so that oxygen reaches it evenly, ensuring a strong burn.
Step 4: Lighting the Steel Wool Safely
Ignite the wool using a lighter or 9V battery. Always maintain a safe distance from others and wear protective gear, such as fire-resistant clothing, gloves, and safety glasses. Confirm the area is free of flammable objects like dry grass or wooden structures.
Step 5: Spinning the Steel Wool for the Best Effects
Spin the whisk steadily in a figure-eight motion. Consistent speed creates smooth arcs, while varied patterns add creative results. Experiment with the distance between the subject and the camera to alter the scale of the sparks. Multiple spins during one exposure can fill the frame with dense trails of light.
Step 6: Post-Processing to Enhance Steel Wool Photos
A darker background makes the sparks stand out, while clarity adjustments add more definition. For extra detail, apply an image sharpener carefully to the sparks so they appear crisp without over-processing. This step transforms the photo from a raw capture into a polished composition ready for presentation.
Creative Steel Wool Photography Ideas
We have prepared a list of creative ideas that you can implement using readily available materials. All you need to do is purchase the necessary steel wool and find a few items at home.
1. Umbrella Steel Wool Photography
 The algorithm is the same, but now you need two people. The assistant will spin the steel wool behind the model while you take pictures. The umbrella should not be made of synthetic fabric, as it can catch fire just like clothing.
Tip: if you are planning a dramatic effect with umbrella steel wool photography, position the camera lower and shoot from the bottom up. This will enhance the fiery dome.
2. Experimenting with Different Locations and Perspectives
 If you choose the beach as your location, try to capture the reflection of sparks in the water. This will make the lights appear larger. Or use a mirror to reflect the model against a bright background.
If you choose a cave as your location, place the camera slightly lower for a more dramatic rain effect. Rocks always look good in the background, and inside them, it will be completely dark, which will help make the light brighter.
Capture the view from above with a drone, but make sure the sparks are not too close to the device. Try combining night stars and sparks from steel wool for photography.
3. Combining Steel Wool with Other Light Painting Techniques
 For this idea, grab some extra light. Put it in the background. This way, you can add some color to your photo. You can also outline the figure in the frame and make an explosion of sparks from steel wool in the background. All of this can be done in Lightroom, Photoshop, Snapseed, or any Photoshop alternative for Mac if you are a beginner and find these programs difficult to use.
If you lack creativity, take LED sticks or a flashlight and try drawing. For example, you can write a word inside the circle that would reinforce the context of the photo shoot. Or you can make colorful patterns on the sides of the spinning cotton wool.
Editing Your Steel Wool Long Exposure Photography with Luminar Neo
 Post-processing is used to enhance the best features of the steel wool photos, bringing out the spark trails and improving exposure. The Luminar Neo features AI-powered functions that simplify the workflow, including intelligent exposure optimization, noise reduction, and color correction. These features allow one to rapidly fine-tune shots without losing the natural fiery effect of the spinning effect.
To make last-minute changes, you could use the best editing software for photographs and edit the contrast, Saturation, and Shadow details. Sharpness can also be enhanced, undesired artifacts eliminated, and a creative appearance experimented with while retaining the final appearance of your steel wool pictures.
Your AI-Powered Photo Editor for MacOS and Windows
Discover Now!Common Mistakes and How to Avoid Them
Selecting unsafe locations, like dry grass or areas near flammable objects, is considered one of the most common issues in steel wool photography. The other common error is a poor choice of camera settings, resulting in either blown-out highlights or overly dark photos. These risks can be eliminated by planning the session ahead and prioritizing safety.
The other problem is observed when spinning; either the exposure time is too short and the spark trails are cut off, or the exposure time is too long and the frame might be overexposed. Novices are also more likely to move the whisk in an uneven manner, which causes light patterns to become chaotic rather than smooth. A steady motion and trying multiple exposure lengths will help create clean, striking images.
Expanding Your Skills: What’s Next After Steel Wool Photography?
The last step is to edit the photo. Adjust the white balance so that the sparks are not too bright and look natural. To make the fire stand out against the background, increase the contrast and slightly darken the exposure. You can make the background cooler and the sparks warmer.